Showing posts with label community service announcement. Show all posts

Sunday, May 17, 2009

Trials with RecordMyDesktop

I've been playing with recordmydesktop lately in order to put some suitable screencasts together for demonstrating various Linux-related activities to university students next week.

Unfortunately, both Fedora 11 and Ubuntu Jaunty have issues with RecordMyDesktop -- the current version (0.3.8.1) is much better than the last version I tried (0.3.5) in terms of both video and audio quality, but the more-than-occassional


Broken pipe: Overrun occurred.


Cause audio to be clipped rather badly.

The default settings make the video speed up and therefore finish well before the audio too -- so I set about trying to find the optimium settings to make the best encode I could.

First, if you are using a 3D Window Manager (such as Compiz), please use the --on-the-fly-encoding and --full-shots options, or everything from opening new windows to redrawing your background will end up with corruption.

If you do not know which Window Manager you are running, you can use the Visual Effects tab of the Appearence Preferences window.
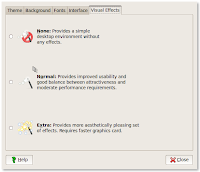


If the button is in the first box (None) then you are not running a 3D Window Manager, if it is in either the Normal or Extra boxes, you are.

Now we've figured out if we need the options for 3D Window Management, it's time to move on to the audio -- in it's default configuration, the program will clip and/or drop audio because of the overrun mentioned above, but you can reduce that by a fair proportion by either:


  1. Using pasuspender to launch the program. This particular solution was suggested by an Ubuntu developer on a reported bug about RecordMyDesktop that looks very similar to the particular issue we're covering here.

  2. Configuring an .asoundrc file to use PulseAudio for all ALSA based audio by default.


The latter is done by creating a new blank file in your home directory and adding the following code:


pcm.!default {
type pulse
}

ctl.!default {
type pulse
}


Save the file, exit, log out of your session and login again.

This alone reduced the dropped audio from 7 occassions in one minute's worth of recorded footage to 3.

The former is done by adding: pasuspender -- to the beginning of the command line.

On my laptops, using pasuspender made no real difference to the problem, which is why we're preferring the .asoundrc solution for the remainder of this discussion.

Another thing that helps lower the frequency of audio dropouts is to increase the buffer size used by RecordMyDesktop -- the defaults are 4k, raising that to 16k helps dramatically, but any higher doesn't seem to offer that much of an improvement (I tried 32k (32769) and 64k (65538) when testing -- i'm only recording two channels on an internal microphone though, your milage may vary)

You can do this by adding the --buffer-size 16384 option to the command line.

update (2009-05-17): At the highest quality audio and video settings, 16384 can still cause dropouts, so 65538 is now preferred.

Next, if you're using onboard audio (like Altec Lansing laptop audio) you may see:


Playback frequency 22050Hz is not available...
Using 44100Hz instead.
Recording on device hw:0,0 is set to:
2 channels at 44100Hz


The Altec Lansing Audio, as well as several other Intel based sound cards that use the hda-intel-audio driver, will resample 44100Hz input to 48000Hz, hence the error.

To fix that, you pass --freq 48000, which allows recording of audio without any extra resampling.

Now, if you've used the pasuspender solution above, or your audio seems to be correctly synced, you can move on to the next section.

If, on the other hand -- you still see Buffer Overrun errors, or your audio is out of sync, or you use my .asoundrc solution above, you'll need to pass an additional audio-related option on the command line:

-device plughw:0,0

Using plughw, allows ALSA and PulseAudio's internals to handle all of the resampling work -- or endian-conversion work automatically, which reduces a painfully large ALSA configuration that will differ on every soundcard on the market, to a single configuration change for our purposes.

The 0,0 (aka. use the first detected virtual sound device) should be fine for almost everyone working on a standard configuration -- if you've got:


You may have more than one plughw device to choose from -- choosing which one is beyond the scope of this article though.

Now we can move onto improving the video quality.

Next, it helps to set the framerate -- i've seen numerous articles on the web about this, everyone suggesting everything from 10fps to 90fps to get a clear picture.

I tried 10, 12, 20, 25, 29, 50 and 60 (these seem to be the ones that are mentioned the most, in a four page Google search on the subject) -- 10 works if you want to keep the filesize low, but the playback video seems too jerky -- 60 doesn't increase the filesize, but does have an unwanted side-effect of the video finishing well before the audio when you play it back.

The optimum setting I found was --fps 20.

Finally, because I wanted to re-encode these for different purposes, I like to do the initial encoding with the highest quality possible.

However, the difference between -v_quality 1 and -v_quality 63 was minimal at best on my 1280x800 resolution.

Somewhat obviously though, the -v_bitrate option makes A LOT of difference, so I bumped that to the highest number available (2000000).

The recommended command line(s)


I've provided both a high and low quality setting for those people who are interested

The final command line, that works for me and provides the highest quality, lowest distortion with no dropouts -- was:


recordmydesktop --on-the-fly-encoding -v_quality 63 -v_bitrate 2000000 -s_quality 10 --full-shots --fps 20 --freq 48000 --buffer-size 65538 -device plughw:0,0


For a smaller filesize or for encoding on older or busier machines, with quality suitable for downloading or streaming, you can use:


recordmydesktop --quick-subsampling --on-the-fly-encoding -v_quality 10 -v_bitrate 50000 -s_quality 1 --full-shots --fps 10 --freq 48000 --buffer-size 16384 -device plughw:0,0


This option does the encoding after the video capture has stopped, which results in a smaller filesize at the expense of taking longer to encode your original footage, you can offset this somewhat by adding the --quick-subsampling option to your command line, which saves CPU time by discarding extra pixels when calculating the chroma values during the encoding process.

note: If you are using a 2D Window Manager (such as Metacity), you may omit the --full-shots option, which halves the filesize on my Ubuntu Jaunty Jackalope install.

Why No Examples?


Google doesn't support Theora based videos to be uploaded to Blogger, I had two videos recorded of 10 seconds each, the low quality one (using the settings above) clocked in at 220 kilobytes, the high quality one was 1.3 megabytes.

When El Goog does decide to allow Theora based videos on Blogger, i'll post them -- but converting them to .mp4's just to show you all what they looked like, seemed rather purpose defeating :)

Tuesday, May 12, 2009

Converting Videos to be Nokia N9x Compatible using FFMPEG

This is being posted here so I have something easy to look up when I need to do it over again, but using FFMPEG 0.5.x, you can easily convert any playable movie to a Nokia N9x (N95, N96) compatible MP4 format file with the line:


(ffmpeg | ffmpeg.exe) -y -i [input file].[extension] -f mp4 -vcodec libx264 -level 21 -s 320x240 -b 768k -bt 768k -bufsize 2M -maxrate 2M -g 250 -trellis 1 -refs 3 -keyint_min 25 -acodec libfaac -b 128k [output filename].mp4


Which converts any playable video to a compatible (-level 21), correctly sized (-s 320x240) MP4 based video file with AAC audio (-acodec libfaac -b 128k) that doesn't crash the RealPlayer version on phones in Australia/New Zealand because the buffers and bitrate are cool (-b 768k -bt 768k -bufsize 2M -maxrate 2M).

The other options are entirely optional, but the -g 250 & -keyint_min 25 are recommended if you have a PAL based input stream and would like to be able to fast forward and rewind your video using the funkey buttons on the N96.

Thursday, May 7, 2009

Automatic Vista Speedup with a D-Link DIR-625

note: This article is intended for a technical audience -- you should use caution when modifying a production system -- caveat emptor.

This probably works with the other DIR-6xx models that D-Link sells too, but recently oldfeeb had an issue where his girlfriend's computer (Vista Home Premium) stopped talking wirelessly to the new DIR-625 he'd bought.

He uses Ubuntu, so he saw no difference, but the symptoms on Vista were related to Windows Mail and Internet Explorer refusing to browse, or overly long timeouts.

First up, update Vista for all the recent fixes and reboot -- no luck.

Noticing the cordless phone handset on the wall, I thought: change the wifi channel on the router to something that doesn't conflict with things like cordless 2.4Ghz phones, move channel 5 to channel 11, check.

Reboot Vista, slightly better signal, but the network is still slow -- Google works now, but only after 30 odd seconds, but her mail times out and heavier webpages die a quiet death.

So, using a tip that I found courtesy of Australian Personal Computer magazine some years ago and a bit of Googling, we switched off Vista's 'Autotuning of TCP parameters'.

To do this, you'll first need to open a command prompt as the Administrative User -- which involves:


  1. Go to Start / Run

  2. Type "cmd.exe" into the box provided.

  3. Hold down the Control and Shift keys together -- then -- press [ENTER].


Now, type the following at the prompt:


netsh interface tcp set global autotuning=disabled


Restarted IE7, fired up Google, works flawlessly.

"OK, I thought -- put the Wireless Channel on the router back to 5 (the default)."

We did, rebooted Vista -- Stone, Cold, Silence.

Switched it back to 11, rebooted Vista -- everything's peachy again.

So, sometimes it's not just Vista's fault -- I guess if you're going to buy a Wireless router, you should check what channel ranges are valid for the country you're trying to use the hardware in, before blaming the workstations directly.

Tuesday, April 14, 2009

Installing VMWare Tools on Ubuntu Guest Servers

After hunting around on the web for a while, I couldn't find anyone who answered this in a way that people could run step-by-step, so I hope this helps other people in the future.

I used Ubuntu 8.04.2 LTS for the purposes of this example, but a similar, if not identical set of commands should work for any version of Ubuntu Server.

First, you'll need to have installed VMWare on Windows or a UNIX server and have your Ubuntu Guest running, then you can go to "VM / Install VMWare Tools".

Your first problem, because you're not running a desktop system in your guest -- the CDROM is not automounted for you, so you'll need to do:

mount /media/cdrom

Next, you'll need to copy the .tar.gz file to a place on the installation that has write access, like /tmp:

cp /media/cdrom/VMwareTools-*.tar.gz /tmp/

Next, extract the file:

tar zvxf VMwareTools-*.tar.gz

Change to the directory:

cd /tmp/vmware-tools-distrib/

Now, before we actually run the installer, Ubuntu Server needs some packages installed so the new kernel modules can be built successfully.

apt-get -f install build-essential linux-headers-server linux-server

Once they've been successfully installed, you can run:

sudo perl vmware-install.pl

Most of the defaults are fine, when you are asked for "the location of the C header files for your running kernel" you'll need to answer with the include directory from the kernel you are currently running -- from the looks of things, this trips people up sometimes.

(Ubuntu doesn't ship with a /usr/src/linux directory, so if you press [ENTER] here, you'll get a "Directory not found" message and asked to re-enter the location)

As of the time of writing, the kernel is 2.6.24-23-server, so your location would be:

/usr/src/linux-headers-2.6.24-23-server/include

Once you've done that, the configuration routine will continue through to the end normally and you can reboot your guest OS in order for the changes to take effect.

Monday, March 30, 2009

Could Not Modify Header Information - A Wordpress Experience.

I've been playing with Wordpress as a CMS project recently and came across an interesting "semi-bug(let)" that took ages to resolve, but was rather simple in the end.

A white screen.

Attempting to login to my admin screen after being logged out after a connection dropout gave me a blank screen, nothing on view-source: and no errors in the Apache logfile.

Googling for the issue, I found several posts advising me to clean out my browser cache, clear cookies and check to see if my wp-config.php file ends with a blank line.

None of those fixed it, so I went hunting further and saw people suggesting that one should remove any plugin code -- having a Wordpress installation with heaps of plugins, removing them one-by-one was annoying at best, but some more searching found this neat plugin to resets Wordpress back to it's installation defaults with one click.

(Obviously, if you care about the contents of your blog, or the settings you have crafted for the individual plugins, this isn't for you -- but it helped me out immensely. Kudos to Matt for inventing it.)

Nope -- didn't fix it either.

Removed my theme, restored the default Kubrick theme ...

*shazam*

Fixed.

Put my theme back, logged out, logged back in:

A White Page.

OK, at least I have something to go on, it's a problem with the theme. So I started to poke around further.

It turns out, the functions.php file cannot have spaces in between the functions you define, compare the following code:


<?php
if ( function_exists('register_sidebars') )
register_sidebars(2, array(
'before_widget' => '<li class="widget %2$s">',
'after_widget' => '</li>',
'before_title' => '<h2 class="widgettitle">',
'after_title' => '</h2>',
));

function widget_search() { ?>
<li class="widget widget_search">
<h2 class="widgettitle">Search</h2>
<input type="text" id="searchfield" />
<img id="searchspinner" src="<?php bloginfo('template_url'); ?>/images/ajax-loader.gif" alt="∗" />
<script type="text/javascript">
var search = new Search('searchfield', 'searchspinner');
</script>
</li>
<?php }
if ( function_exists('register_sidebar_widget') )
register_sidebar_widget(__('Search'), 'widget_search');

?>

<?php

function theme_comments($comment, $args, $depth) {
$GLOBALS['comment'] = $comment;


(code edited)


Fails, but:


<?php
if ( function_exists('register_sidebars') )
register_sidebars(2, array(
'before_widget' => '<li class="widget %2$s">',
'after_widget' => '</li>',
'before_title' => '<h2 class="widgettitle">',
'after_title' => '</h2>',
));

function widget_search() { ?>
<li class="widget widget_search">
<h2 class="widgettitle">Search</h2>
<input type="text" id="searchfield" />
<img id="searchspinner" src="<?php bloginfo('template_url'); ?>/images/ajax-loader.gif" alt="∗" />
<script type="text/javascript">
var search = new Search('searchfield', 'searchspinner');
</script>
</li>
<?php }
if ( function_exists('register_sidebar_widget') )
register_sidebar_widget(__('Search'), 'widget_search');

?>
<?php

function theme_comments($comment, $args, $depth) {
$GLOBALS['comment'] = $comment;


(code edited)


Works perfectly.

So where was the problem?

the blank line between the closing ?> in the register_sidebar_widget call and the opening <?php in the theme_comments function.

Undoubtably, your error will occur between a different set of functions, but if you are using a functions.php file in your theme and it begins to fail unexplainedly on you, check the file for blank lines between functions as part of your diagnostics plan.

Friday, December 26, 2008

Automounting SAMBA Shares

note: This article is intended for a technical audience -- you should use caution when modifying a production system -- caveat emptor.

This is more of a collaboration of other people's posts, with some additions of my own for performance-related issues.

Basically, I manage a bunch of WD MyBook Network Drive (World Edition) boxes for various people -- typically, these are hooked up via SMB shares to various types of Linux install for redundant network backups over the LAN.

After various hacks, from mounting as part of a cronjob to modifying /etc/rc.local -- I decided to attempt automatic fstab mounting under the christmas break and figured i'd document my findings here.

First off, to automatically mount the filesystems on the MyBook -- you need to add lines similar to the following to your /etc/fstab file.


//[SMB SHARE]/[sharename] /media/[mountpoint] cifs credentials=/root/.smbcredentials,rw,iocharset=utf8,uid=[username],gid=groupname,file_mode=0664,dir_mode=0775 0 0


(note: Blogger has wordwrapped this post, but this should be one line when copied to your /etc/fstab file.)

Where:


  • SMB SHARE -- Is the NETBIOS name or IP address of the MyBook.

  • sharename -- Is the name of the share you need to mount (personally, I like to make at least shares based on the usernames using the box).


  • credentials=/root/.smbcredentials -- Is a plaintext file containing the username and password of the user you have created on the MyBook.


  • iocharset=utf8 -- Specifies that all files written or read from the device should be in the UTF-8 character set.

  • rw -- Specifies that access to the share should be read-write.

  • uid=username,gid=groupname -- Specifies the username and groupname on the local Linux machine.

  • file_mode=0664,dir_mode=0775 -- Specifies the octal permissions of the files written on the MyBook.


  • 0 0
  • -- Means fsck will not attempt to check the filesystem under any circumstances, this is always advisable when mounting SMB shares.


After you have edited your /etc/fstab file, you need to make your credentials file -- this file specifies the name and password of the user on the MyBook.

This file needs two lines, with a trailing blank line -- and should usually be placed in the /root or /etc/samba directory and have 0600 permissions.

An example of this file is:


username=winuser
password=winpassword


Save this file and change it's permissions, then alter your /etc/fstab file to point to it's location.

Once you've done this, you should be able to have your shares automatically mounted by your Linux box (after either rebooting or running mount -a as root).

One particular quirk you might find using this method -- is unmounting errors -- these occur because the shutdown routine (by default) shuts down the network devices (specifically, those machines running NetworkManager to control network resources) before unmounting any mounted network shares (ie. what we're trying to achieve here).

These errors usually halt the shutdown of your machine (usually meaning you have to power off using the power button, which can damage your filesystem).

To fix this, you can run the following as root:


ln -s /etc/init.d/umountnfs.sh /etc/rc0.d/K15umountnfs.sh
ln -s /etc/init.d/umountnfs.sh /etc/rc6.d/K15umountnfs.sh


Which will alter your system to unmount the network-attached shares before NetworkManager has a chance to shutdown the network devices.

Thursday, November 20, 2008

Repairing an Apache 2.2 Modules Installation.

note: This article is intended for a technical audience -- you should use caution when modifying a production system -- caveat emptor.

Sometimes, Ubuntu (and before it, Debian) drives me up the wall.

Recently, an apache2.2-common upgrade saw fit to blow away my /etc/apache2/mods-enabled directory, but not recreate the defaults, so I was left with an empty directory and a server that wouldn't restart due to various errors that looked similar to:


"Invalid command 'Order', perhaps misspelled or defined by a module not included in the server configuration"?"


Looking around on the web, this doesn't appear to be a new issue, but it doesn't appear to be terribly well answered either -- all I knew, was that I had a box that needed SSL, PHP, Expiry Headers and well, that's it -- aside from the basic functionality.

My first test was to purge the package and re-install it, which did give me back the functionality I wanted, together with a bunch of other modules I didn't need -- I proceeded to leave it and go to bed, only to be greeted with a message from the hosting provider telling me i'd overblown my shared-hosting's RAM quota for the day and that my account was temporarily suspended.

So, I removed the directory and started working piece by piece to put things back together until both Wordpress and OSCommerce booted up and ran correctly.

note: You can also do this with Apache's handy a2enmod program, but i'm a purist -- so i'm going to do it here via 'ln -s'.

First, to obtain basic functionality, you'll need to log in as root (or sudo to root) and issue the following commands, depending on which error your Apache 2.2 installation gives you.

If you see: "Invalid command 'Order', perhaps misspelled or defined by a module not included in the server configuration?", run:


ln -s /etc/apache2/mods-available/authz_default.load /etc/apache2/mods-enabled/authz_default.load
ln -s /etc/apache2/mods-available/authz_host.load /etc/apache2/mods-enabled/authz_host.load


If you see: "Invalid command 'DirectoryIndex', perhaps misspelled or defined by a module not included in the server configuration?", run:


ln -s /etc/apache2/mods-available/dir.load /etc/apache2/mods-enabled/dir.load


If you see: "Invalid command 'Alias', perhaps misspelled or defined by a module not included in the server configuration?", run:


ln -s /etc/apache2/mods-available/alias.conf /etc/apache2/mods-enabled/alias.conf
ln -s /etc/apache2/mods-available/alias.load /etc/apache2/mods-enabled/alias.load


If you see: "Invalid command 'AddType', perhaps misspelled or defined by a module not included in the server configuration?", run:


ln -s /etc/apache2/mods-available/mime.conf /etc/apache2/mods-enabled/mime.conf
ln -s /etc/apache2/mods-available/mime.load /etc/apache2/mods-enabled/mime.load


If you don't see any of those, but Wordpress 2.6.x (or 2.7.x) will not let you login (ie. you can install it, and you see the admin screen, but you get 'permission denied', 'forbidden' or a directory index -- rather than your admin dashboard) then try running:


ln -s /etc/apache2/mods-available/asis.load /etc/apache2/mods-enabled/asis.load


and restart Apache.

update [12-12-2008]: Wordpress 2.7 will fail to install unless you have the 'env' module installed, so you may also need to run:


ln -s /etc/apache2/mods-available/env.load /etc/apache2/mods-enabled/env.load


Once you've restarted, your Apache installation should basically work -- to add advanced functionality, you should visit the Apache 2.2 Modules Documentation pages and adapt the lines above to suit the function you need.

Monday, October 13, 2008

Smart-ISP Configuration for Postfix.

note: This is another 'no-brainer, don't forget this again' type post, but I thought i'd put it here incase anyone else can make use of it.

Recently, I was told that a client needed to forward all their corporate mail via their local ISP and that I should set that up for them using their existing, internal-only mail handling Postfix server.

The key additions to their /etc/postfix/main.cf file was (aside from configuring SASL, which you should do anyway and setting the relayhost parameter correctly) was:


+++ mydestination =
+++ local_recipient_maps =
+++ local_transport = error: no local delivery service


and:


+++ myorigin = the outbound domain name you need.


Then, you need to comment out (with a #) the local transport method in your /etc/postfix/master.cf file.

Remember that, brain!

Tuesday, April 8, 2008

OpenOffice 2.4's Compatibility with Microsoft Word 2000-2007

After yet-another virus outbreak at my better half's university -- I set about installing Linux on her machine, overwriting the old Windows 2000 with Word 2003 setup that i've re-installed, patched and registered no less than four times in the last six months.

Two weeks in, she's mostly satisfied -- but there's sticking points with OpenOffice and the compatibility with Microsoft Word.

Thankfully, there's some cute things you can do to to improve the look and feel of OO.o under Linux.

note: This has been tested with Novell's version of OpenOffice (currently 2.3) and Ubuntu's Hardy version (currently 2.4.0) -- milage shouldn't, but may vary on other platforms.

Overall Document Compatibility

First of all, open OpenOffice Writer and find the Tools / Options menu.

Then select OpenOffice.org Writer from the left-hand menu -- your screen should look something like the screenshot below:


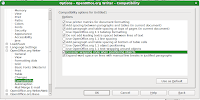
Next, choose Compatibility, your screen should look like:


Now, to obtain decent compatibility with Word 2000/2003/2007 make sure these options are checked:

  • Use printer metrics for document formatting
  • Add spacing between paragraphs and tables (in current document)
  • Add paragraph and table spacing at tops of pages (in current document)
  • Do not add leading (extra space) between lines of text
  • Add paragraph and table spacing at bottom of table cells
  • Consider wrapping style when positioning objects
  • Expand word space on lines with manual line breaks in justified paragraphs

When you've finished, your screen should look like:


Finally, to set these options as default -- simply click on the Use as Default button, then the OK button to return to the program.

Microsoft-Sized Margins

The next query had to do with the margin size in OpenOffice, which I personally like -- but university lecturers take umbrage with, so we'll alter those to be more compatible with their Microsoft brethren, which has the added side-effect of being WYSISYG to most extents when the document is printed via Word.

To do this, we need to make alterations to the default template. I'm presuming you're starting with a blank document on the screen, just by the way.

First of all, find the Format / Page menu -- your screen should look something like the screenshot below:


The default margin sizes in OpenOffice are 2cm (two centimetres -- or around 0.78 inches for US readers)

Whereas, the default margin sizes in Microsoft Word 2003 are 3.81cm (1.5 inches) for the top and bottom margin and 2.54 cm (1.0 inches) for the left and right ones, so you need to alter the Left, Right, Top and Bottom margins on this page to match the screenshot below:


Now that we've modified our blank page to be more Word Compatible at the expense of being less tree friendly, we can now save it for use as a template.

Find the File / Templates / Save... menu, your screen should look something like the one shown below:


There will be a text field you can edit called "New template". Enter "Microsoft Word Compatible" or a similar defining name here.

Below the edit box is a section titled Templates for organizing a lot of templates if you had many that you used. Given we are only modifying a single template, leaving it under the My Templates category is fine.

Finally, press OK to save it.

At this point, OpenOffice will continue to use the default margins, If you would prefer to set these margins as your default template for whenever you make a new document there are a few extra steps to follow:

First, go to the File / Templates / Organize menu and double click on the "My Templates" folder.

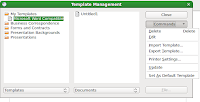
Under the directory, your "Microsoft Word Compatible" template that you created should appear. Right click on it and select "Set as Default Template" -- your screen should look similar to:


Now press "Close" to exit the dialogue and return to OpenOffice, from this point on -- all new documents will use Microsoft Word compatible margins and page-widths by default.

Speedier Startup

Not that it's really anything to do with compatibility, but if you don't use the Java components in OpenOffice on Linux (ie. you have no JDK installed) you can save a few seconds start-up time and have a snappier interface by turning the java components off, to do this, go into the Tools / Options menu.

Then select Java from the left-hand menu and uncheck the Use a Java Runtime Environment box.

Close OpenOffice and re-open it for a much speedier environment.

Wednesday, April 2, 2008

Streamlining the Ubuntu Boot Process

note: This article is intended for a technical audience -- and while it seems to works for the two systems i've tried it on since, you should use caution when modifying a production system -- caveat emptor.

Not-so-simple one line fix that shaves a good 5-10 seconds off the boot up time of a 1.8ghz HP Notebook machine.

Open a terminal and use sudo with your favourite text editor to edit the /etc/init.d/rc file, eg.

sudo vim /etc/init.d/rc

Then, around line 24, change:


--- CONCURRENCY=none
+++ CONCURRENCY=shell


Save the file, then the next time you reboot -- Ubuntu's base bootup speed will be even more similar to a Microsoft operating environment than ever before.

Tuesday, March 25, 2008

Recovering your Password Database in Epiphany 2.20.x on Ubuntu

Having just upgraded my laptop to the recently released beta version of Ubuntu's next Long Term Service release (Hardy Heron -- aka. 8.04), I started up my preferred browser (Epiphany) and discovered that my saved web password database was empty.

After a bit of web hunting, I discovered that the new Firefox 3.0 betas have a new version of the signons.txt file that Mozilla/Firefox/Epiphany use to store the actual password.

Looking in my .gnome2/epiphany/mozilla/epiphany directory, I noticed a signons2.txt file and a new, blank signons3.txt file.

I also noticed that the datestamp on the key3.db file had been updated to today's date.

First, I tried renaming the signons2.txt file to signons3.txt and restarting Epiphany -- as expected -- the datestamp of signon3.txt was now the same as key3.db.

Going into the Personal Data / Passwords menu in Epiphany now gave me access to some passwords, but not all -- plus there was some duplication between passwords.

So, I tried deleting both the key3.db and the signons3.txt file -- and copying a backup version of both files (with an older datestamp) to my epiphany profile directory and then renaming signons2.txt to signons3.txt.

Restarted Epiphany and from a terminal window, noticed both files had been updated to the current time.

This time, going back to the Personal Data / Passwords menu in Epiphany now gave me access to all my old password information.

So, in a nutshell -- to upgrade from Ubuntu Gutsy to Ubuntu Hardy's Epiphany seamlessly, you should use a three step process:

* Backup your .gnome2/epiphany directory before doing your upgrade.

* After doing your upgrade, copy the key3.db and signons2.txt files from your backup into your updated .gnome2/epiphany/mozilla/epiphany directory.

* Before using Epiphany for the first time, copy your signons2.txt file to a new file called signons3.txt.

note: this issue has also been reported to the Ubuntu Bug Tracker as #180205.

Wednesday, March 19, 2008

Improving Browser Speeds in Epiphany

Mainly a 'remember these for later brain' post -- but people might still get a fairly good speed improvement out of them with Xulrunner or Gecko.

updated (10-04-2008): added screenshots -- so it matches the other HOWTO's here :)

Remove the initial rendering delay

Firstly, Open Epiphany (all of these work for Firefox as well, mind you.) and type about:config into your location bar.

You should see a screen that looks like the one below:


First, Gecko (the Mozilla Backend) uses a delay when rendering any new page on-screen -- you can remove this delay by right-clicking anywhere in the main window and creating a New Integer key.

In the textbox that appears, name the new key “nglayout.initialpaint.delay” and set its value to “0″.

Disabling IPv6

Next, if you don't use it -- IPv6 can add delays to any page you view -- you can turn it off in Epiphany by toggling the "network.dns.disableIPv6" key to true.

First, find the "network.dns.disableIPv6" key in the filter, your screen should look similar to:


Right click the key and press the Toggle button -- your screen should now look like:


Disabling Prefetching


Prefetching, otherwise known as the ability to cache the next page you might want to read can actually slow your browsing down if you're on a larger network, behind a proxy or just browsing a site on a slow server -- also, SSL pages (such as those on online banking sites) are much snappier if you turn this off, although i've yet to prove why this is true, or if it's just a side-effect something else.

Anyway, to turn prefetching off -- find the "network.prefetch-next" key in the filter, your screen should look similar to:


Right click the key and press the Toggle button -- your screen should now look like:


Tuning Pipelining


Pipelining refers to the ability to use one HTTP connection to obtain multiple pieces of data -- reducing the load on the servers you are browsing and maximising the amount of data your connection can receive.

There's a LOT of discussion about pipelines and their use -- i've seen pages that tell people to increase their pipeline count from 4 to 30, 60 or even 100 -- of course, telling the server you can fit more data into one connection than you can possibly receive is annoying for server administrators ...

Why?

Imagine you've got a server that hosts something reasonably popular and you've got a client that doesn't support pipelining, one that does using the default and and one that's tuned their client to receive 100 requests at once ...

The server, that basically knows nothing about what an end-user can support when it is asked to build a new connection, so in this case it would allocate enough resources to send 105 requests at once.

Even though the average broadband (512k ADSL) connection would use 5 in about the same fashion at the receivers end.

Considering the maximum number of actual connections to a particular server is in the range of 4 and 16 and that HTTP requests remain open between your client and the server for 300 seconds (both of which we'll tune later in this article) -- requesting an excessive amount of data per request is just poor considered poor etiquette.

So, let's tune our pipelining to a value that makes sense from both an available bandwidth point of view and doesn't annoy every network administrator on the planet.

To do this, we need to make sure pipelining is turned on, then we need to set two values -- one for connections created normally and one for those created by a proxy.

First, find the "network.http.pipelining" key in the filter, your screen should look similar to:


Right click the key and press the Toggle button.

Next, repeat the process for the network.http.proxy.pipelining key.

Finally, we need to define a value -- this basically depends on the type of site you're browsing, but it is considered to be poor form to make this value more than a double digit number -- I'm using 8 on all my boxes, 12 works quite well too on my 3 megabit connection, but I personally wouldn't recommend anything higher than that -- when you're done, your screen should now look like:


Tuning Per-Server Connection Limits

Now that we've tuned the pipelined connections, we need to increase the number of connections that your browser can open to a server before needing to queue new ones -- this speeds up sites that host their static content on other servers to the dynamic content, as well as making more efficent use of prefetching too.

To do this, find the "network.http.max-persistent-connections-per-server" key in the filter, your screen should look similar to:


The defaults in Firefox 2.x (xulrunner 1.8) are 2, they have been recently increased for Firefox 3.x (xulrunner 1.9) to 6.

Personally, i've found 4 to be a reasonable number on my lower-end machines (those less than a P4 1.5ghz), I use 8 everywhere else, because it matches my pipelining use.

Increasing this number to more than 10 makes the performance of Epiphany actually reduce considerably, it makes significant delays after the fourth or so page I access at once, possibly due to the fact the maximum total number of connections that Gecko opens at once is 24 (or 32, if you're using a newer Firefox 3.x build).

Right click the key and press the Modify button. Now enter the value in seconds that you'd like to change it to -- remembering the guidelines listed above.

Your screen should now look like:


Tuning Keepalive Timeouts

HTTP Keepalives play an important role in how long upstream servers keep connections open to the one client. It's incredibly useful being able to hold a connection open for a client, but having your client tell the server to hold it for 300 seconds (5 minutes) uses valuable resources on internet servers, as well as holds valuable RAM within your browser -- Basically, on the off chance you might go back to that site within the 5 minute window.

In my experience, 60 seconds (1 minute) works just as well, as is far friendler to the internet at large.

Before anyone asks (someone over my shoulder just did) -- this is not the same thing as a website timing your session out due to inactivity (like an online shop or a bank) -- this is the lower-level server infrastructure of the interschnitzel, not the website itself.

To change the keepalives to something more friendly:

Find the "network.http.keep-alive.timeout" key in the filter, your screen should look similar to:


Right click the key and press the Modify button. Now enter the value in seconds that you'd like to change it to -- personally, I wouldn't recommend going below 30 seconds (or the pipelining improvements we made above become mooted), but 30, 60, 90 and 120 are all reasonably acceptable values.

When you're done, your screen should now look like:


At this point, you might be inclined to say -- that's fast enough -- but there's one other rendering tweak which makes Epiphany much snappier ...

Tuning Page Re-rendering Delay


These tweaks control the number of times that Gecko/Xulrunner will refresh the page as data is being retrieved. The default is off, which will make the backend re-render the page periodically as each piece of data is being retrived.

If you're not behind a caching proxy, these particular tweaks will improve the amount of time it takes to render a page that contains content coming from a number of different sources (for example, Youtube or the Australian Stock Exchange) as well as remove the hideous delay that the non-free Flash Player has when it is being embedded into a page that contains .swf content.

In order to make this work, we have to add two new entries to our configuration -- right-click anywhere in the main window and creating a New String key.

In the textbox that appears, name the new key “content.notify.ontimer” and set its value to “true″.

Repeat the process, except this time -- make a New Integer key.

In the textbox that appears, name the new key “content.notify.backoffcount” and set its value to “5″.

After pressing OK, your screen should look similar to the one below:


Skip To The End...

Don't want to hear the explainations? Just want to cut-and-paste some recommendations? If so, make sure Epiphany is completely shutdown (or the preferences file will be overwritten with the defaults after you eventually close it).

Open the .gnome2/epiphany/mozilla/epiphany/prefs.js file with your favourite text editor and add:


user_pref("content.notify.backoffcount", 5);
user_pref("content.notify.ontimer", true);
user_pref("nglayout.initialpaint.delay", 0);
user_pref("network.dns.disableIPv6", true);
user_pref("network.http.keep-alive.timeout", 60);
user_pref("network.http.max-persistent-connections-per-server", 8);
user_pref("network.http.pipelining", true);
user_pref("network.http.proxy.pipelining", true);
user_pref("network.http.pipelining.maxrequests", 8);
user_pref("network.prefetch-next", false);


Save your file and re-open your browser for a much, much speedier experience.

Other Advanced Tweaks

note: These particular tweaks should be used by a technical audience only -- they may adversely affect your browsing speed on low-end machines, Epiphany's memory usage, or cause some machines to crash, you should use caution when modifying a production system -- caveat emptor.

These two tweaks control the amount of time (in milliseconds) that it takes the backend to return control to the rendering engine after the user has moved the mouse, used the keyboard or done some other "high-latency" task that pauses the rendering engine in favour of user interaction.

They both depend on the key “content.notify.ontimer” being available and enabled, which you should already have if you have followed the rest of this guide.

user_pref("content.notify.interval", 750000);
user_pref("content.switch.threshold", 750000);

This means the browser will wait less than 1 second (0.75 seconds) to return processing to the renderer, rather than the default 1 second.

On much slower machines, you may want to move them to slightly higher than 1 second values -- which makes the backend give more processing to the user interface at the expense of rendering time. A friend with an older Pentium III on a 256k ADSL connection has better performance from:

user_pref("content.notify.interval", 1250000);
user_pref("content.switch.threshold", 1250000);

Which causes the browser to wait an extra quarter of a second for the user to stop doing anything before giving everything back to the rendering engine -- it also means they can view an extra few pages before Epiphany starts becoming sluggish.

The End...

Sunday, January 27, 2008

Posting Quotes In Blogger

If you use the Blogger website to post your items and you want to post backticks "'" or greater/less-than < or > symbols in the body of your text (for example, if you post code or HTML fragments) you may find you don't get the desired result when pulishing your post.

If you'd like to fix this, you can use the following HTML entities to get the same result, but Blogger won't consider these as HTML codes and will display them literally, meaning your posts will display as normal:

"'" (Backtick) = & # 39 ;
"<" (Left Bracket, Less Than) = & # 60 ;
">" (Right Bracket, Greater Than = & # 62 ;

Tuesday, January 8, 2008

SMTP Unblocking with Optus (Cable or DSL)

In the process of setting up a mail server for a collegue the other night (in order to deliver mail from 6+ domains to one IMAP account) I found an interesting quirk.

After you've set up and configured a working e-mail server, with all the UBL checks and correct delivery methods in place -- if you find other SMTP transactions work OK, but the local client can't connect and you're with Optus (In Australia), go here to turn off the automated port 25 block.

Thinking on though, this procedure unblocks port 25 globally, leaving one open to the prospects of exploit code spamming people by using port 25 on the local machine -- after all, the mail server wasn't on the persons local machine or even their LAN, but halfway across the world -- the Optus site makes reference to the unblocking process being for advanced users -- wouldn't advanced users be better off leaving the block in place for all sites not in a list?

(Yes, the server could use SSL, or even be on a different port -- both would be viable alternatives to opening SMTP from a customer premises to the world)

Monday, January 7, 2008

New Rhythmbox packages for Ubuntu 7.10

Playing with Rhythmbox over the weekend (the 'save art to ipod' patch was committed to SVN and several people I know feel this is a neat feature) -- so i've built a set of updated packages from GNOME SVN (based on revision 5535) for Gutsy Gibbon.

These packages have the code for using the new Totem Playlist Parser backed out (due to it not being available on Ubuntu 7.10, but does include #411634 -- which should stop duplicated tracks appearing on your device) as well as #345975 -- so MP3's with embedded cover art will be shown, just like iTunes)

Packages are in the usual location.

Thursday, December 13, 2007

Installing TTF fonts in Linux

Recently, I was asked how to get downloaded fonts onto an Ubuntu workstation in order to make prettier documents in OpenOffice -- there's two methods to doing this, which I thought i'd document for anyone having difficulties doing it themselves.

This article works on a Fedora 8, an Ubuntu 7.10 and an Ubuntu 6.06 machine -- but mainly relies on an XFree86 4.2 (or later) install with the fontconfig package installed (most current distributions have this installed already).

Method One: Single-user Fonts

Individual Users can install fonts by opening a terminal (Accessories -> Terminal) and making a .fonts directory in their home directory, like:

mkdir -p .fonts

Then, find a TTF font you like (Google thinks here is a good place to start looking) -- download it, extract it (fonts are usually distributed in .zip archives, so you'll need to extract the .ttf font file from it first) and copy it to the .fonts directory you just made.

Then you can either logout and login again, or restart the application you want the fonts to appear in and they should appear for use.

Method Two: System-wide Fonts

Administrators can install fonts by opening a terminal (Accessories -> Terminal), becoming the root user using either:

su - (Fedora)

or:

sudo -s (Ubuntu)

Then making a specific directory in the font location on their machine for TTF fonts (usually /usr/share/fonts/truetype), like:

mkdir -p /usr/share/fonts/truetype/winfonts

Download and extract the fonts to the new winfonts directory you made above, then update the font cache information for the machine by typing:

fc-cache -f -v

note: Some older Linux distributions (Fedora Core 3 and KUbuntu 5.04 both need this) may need to run:

mkfontscale && mkfontdir as the root user before running the fc-cache command above, so that your machine correctly creates a fonts.dir file that can be found by fc-cache.

If you're interested in Free and Open Sourced fonts, you should look at Ed Trager's site on the subject.

Sunday, December 9, 2007

SSHFS (the alternative to fish://) on Ubuntu 7.10

Working on a file located elsewhere in the world, or in the workplace can sometimes become very tedious -- especially when using the SSH option in the GNOME file manager Nautilus, which relies on gnome-vfs module, which has some notable performance issues that still have to be addressed.

On the console, we have the fish:// transport in programs such as Midnight Commander and the excellent FTP/SCP program lftp, but fish:// still tends to be much slower than SSH itself.

Luckily, there's now FUSE & an equally useful drop-in module, SSHFS which allows a user to mount a remote SSH/SCP session as a virtual filesystem, having any modified data copied over the secure tunnel with little to no extra overhead than a straight SSH session instelf.

FUSE is a kernel module for mounting different filesystems by an unprivileged user, which was adopted into the mainline linux kernel a while back. SSHFS is an add-on created by the author of FUSE enabling users to mount remote folders/filesystems using SSH.

The idea is very simple - a remote SSH folder is mounted as a local folder in the filesystem. After that, almost all operations on this folder work exactly as if this was a normal local folder. The difference is that the files are silently transferred though SSH in the background.

Installing FUSE with sshfs in Ubuntu can be done via the Synaptic Package Manager (System->Administration->Synaptic Package Manager or by typing (as root):

apt-get install sshfs

Next, you need to give permission to use FUSE to the relevant users by adding the FUSE group to their account -- again, you can either use the Users and Groups GUI (System->Administration->Synaptic Package Manager) or via the command line using:

usermod -G -a fuse [username]

In Ubuntu Gutsy, the fuse module is already loaded at boot-time via the /etc/modules file -- If you are using Ubuntu Dapper, or another distribution -- you may need to load the module manually, you can do this via the command line by typing:

modprobe fuse

Now we can try to mount a remote folder using the sshfs transport. First, make a directory to use as the mount point for your remote folder (in this example, it's ssh_mount, but you could call it anything you liked):

mkdir ~/ssh_mount

Which would create the /home/username/ssh_mount folder.

Then, run the SSHFS command as you would a standard SCP command:

sshfs remote_username@remote_server:~/files ~/ssh_mount

The command above will cause the folder /home/remote_username/files on the remote server to be mounted as /home/username/ssh_mount on the local machine.

For now on, any file action (copying, editing, removing) to this folder will result in transparent copying over the network via SCP directly, which provides a massive performance improvement over the fish:// transport or the GNOME-VFS implementation.

Once you've finished working with the remote filesystem, unmount the remote folder by running:

fusermount -u ~/ssh_mount

Tuesday, November 20, 2007

.torrent files from the command line

Over the past few weeks, i've been playing with BitTorrent more for moving files around, but found no good way of being able to make .torrent files from the command line.

About a week ago, I found CreateTorrent and attempted to build packages for it, there were two major issues -- 1) there was no ability to make torrents private and 2) the program kept segfaulting whenever there was a '(' or ')' in the directory the files were stored in.

Today, when searching for createtorrent patches on Google, I found:

buildtorrent, which looked to do exactly what I wanted.

The code wasn't GNU Autotools ready, so I spent an hour or so fixing that (patches have gone upstream to the author) -- then I was able to build packages for it.

Ubuntu Gutsy users can grab them from here, packages for other distributions will be available as I have time to build them.

Friday, November 9, 2007

Fedora and The iPod Nano

In semi-celebration of Fedora 8 being released today, I have spent the day wrestling with mock and rpmbuild to bring you up-to-date libgpod packages (built from SVN 1759), allowing Fedora users to try out the new iPod handling code just like Ubuntu users can.

Completely unofficial, just like their Ubuntu cousins -- but they build cleanly and correctly write the Firewire ID to a brand new 3rd Gen Nano (and thus, gtkpod actually syncs music and rhythmbox reads the music).

Packages available from here.

Enjoy.

edit i: It appears the packages weren't actually mentioned in the original post, thanks to James for pointing this out.

edit ii: Yes, these include the snazzy HAL callout method that means you can plug your iPod in and everything is done automatically, no manual firewire hacking required :)

Tuesday, November 6, 2007

Changing the Zen-Cart 'Sales Pitch'

If you use Zen-Cart or OSCommerce, you may have found the need to change the 'Tagline Here' text on the main page at one point or another.

The usual solution is to copy includes/languages/english.php to your template directory and then change the tagline text there -- an adequate solution, if you only work with one template, but what if you run multiple stores, or you are dealing with a user who has no access to the filesystem, or an FTP program, or is simply uncomfortable editing something across a network.

The solultion I came up with, allows you to edit this field directly from the Administration Panel -- first edit the includes/languages/english/header.php file and change:


--- define('HEADER_SALES_TEXT', 'TagLine Here');
+++ define('HEADER_SALES_TEXT', STORE_TAGLINE);


Next, open your Administration Panel and navigate to Tools -> Install SQL Patches and in the cut-and-paste box, add the following:

--- cut here ---

INSERT INTO configuration (configuration_title, configuration_key,
configuration_value, configuration_description,
configuration_group_id, sort_order, date_added) VALUES ('Store
Advertising - Tagline', 'STORE_TAGLINE', 'Tagline Here', 'Set Shop Tagline /
Slogan
Default = Tagline Here', '1', '4', now());


--- cut here ---

Now you can go to Configuration -> My Store and configure the tagline
that is used for your shop, much easier than adding it by hand and much easier than editing your languages file to it.